How To Fix 500 Internal Server Error In WordPress
Have you ever tried to visit your WordPress site only to be greeted by a message saying Internal Server Error or something similar?

It’s a scary error, be
How to fix the internal server error in WordPress.
What Does The “Internal Server Error” Message Mean?
Internal server error (sometimes called a 500 internal server error), is a generic error message that your server gives you when it runs into a problem. Basically, it’s telling you that “something” went wrong… but it’s not very specific about what that “something” is.
That’s not a very satisfying explanation – but again, it’s not a very specific error.
What Causes The “Internal Server Error” Message?
Because this error message is so broad, there’s not a single problem that causes it.
With WordPress, the most common causes are:
A corrupt .htaccess file.
A plugin issue.
Hitting your PHP memory limit.
Corrupt WordPress core files.
We’ll show you solutions for how to fix all of those problems. But if you want to quickly narrow down exactly what’s going on, consulting your server’s error logs is a helpful way to diagnose exactly what’s causing the problem.
If your host uses cPanel, you can view error logs by going to your cPanel dashboard and clicking on Error Log:

Unfortunately, as you can see from the image below, these error logs aren’t always the most user-friendly documents to read:

If nothing obvious sticks out in the error logs, you can:
Consult your host’s support for help understanding what the issue might be.
Jump straight into some of the common fixes that I’m about to outline below.
Note: The following are confirmed hosts that offer cPanel hosting:
Quality Web hosting
How To Fix “Internal Server Error” In WordPress
Here are some of the most common ways to fix this message in WordPress. I recommend that you start at the top (Potential Fix 1) and work your way down.
Potential Fix 1: Generate A New .htaccess File
Your .htaccess file is a configuration file for your web server. WordPress uses it to, among other things, set up.
Because it controls the configuration of your web server, even a tiny mistake in your .htaccess file can cause something like the internal server error message.
Thankfully, this problem is easy to fix – all you need to do is force WordPress to generate a new .htaccess file.
Here’s how:
Step 1: Rename your existing .htaccess file.
To get started, you need to rename your existing .htaccess file. You can do this by either:
Connecting to your site via FTP. You can use FileZilla to do that.
Using your cPanel’s built-in File Manager tool.
I’m going to show you the process using File Manager because it’s the simplest for most users. But the core principles are the same no matter which method you use.
You can access File Manager right from the cPanel dashboard:

Once you open File Manager, look for the .htaccess file in the root of your site.
Right-click it, and choose Rename:
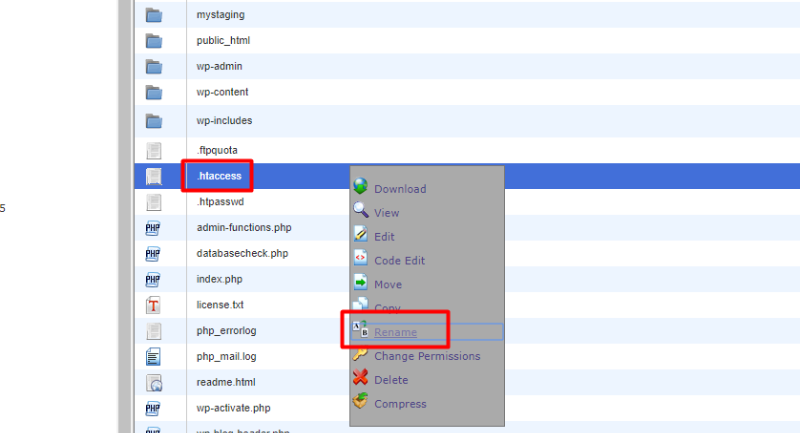
Rename it to something like “.htaccess_old”.
Now, all you need to do is create a new .htaccess file to replace it.
Step 2: Generate a new .htaccess file.
To force WordPress to generate a new .htaccess file, go to your WordPress dashboard.
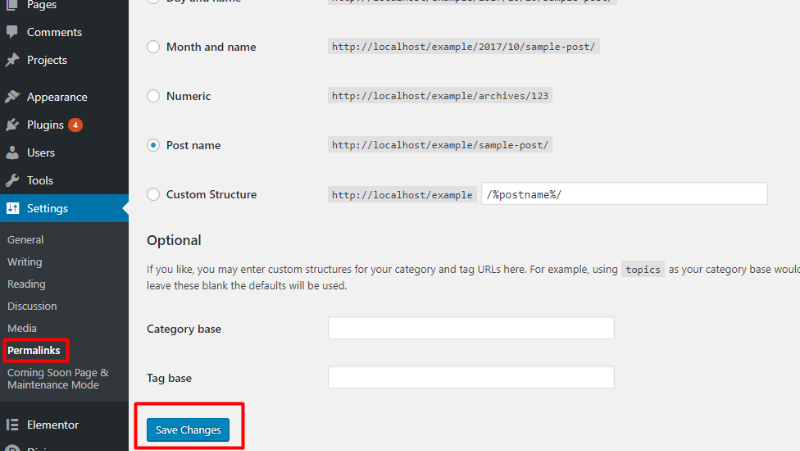
Then, navigate to Settings → Permalinks.
You do not need to change any settings.
Just click the Save Changes button, and WordPress will automatically generate a new, clean .htaccess file:
And that’s it! Hopefully, your site is working again.
Read: How To Create A WordPress .htaccess File
Potential Fix 2: Deactivate Your Plugins And Find Faulty Plugin
If your .htaccess file wasn’t the problem, the next thing that you can try is deactivating your plugins.
Often plugin issues or conflicts can cause the internal server error. This is especially likely if you saw the error immediately after activating a new plugin.
By deactivating your plugins, you can find the problematic plugin and remove it.
How to deactivate plugins if you can still access your dashboard:
If you can still access your WordPress dashboard, go to the plugin management area and use the checkbox to deactivate all of your plugins at once:
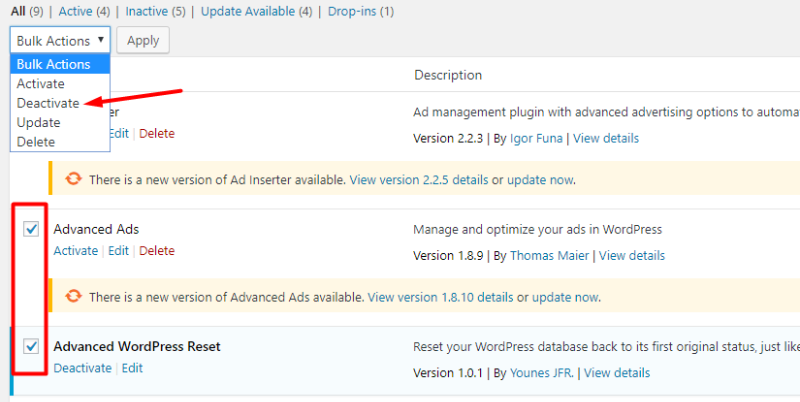
Then, reactivate them one by one to hopefully find the problematic plugin.
How to deactivate plugins if you can’t access your dashboard:
With the internal server error in WordPress, you are most likely not able to access the WordPress admin dashboard. In this case, you’ll need to take a slightly different approach and deactivate plugins using FTP.
Connect to your site via FTP or File Manager. You can use FileZilla.
Navigate to the /wp-content/ folder.
Rename the plugins folder to something like plugins_old.
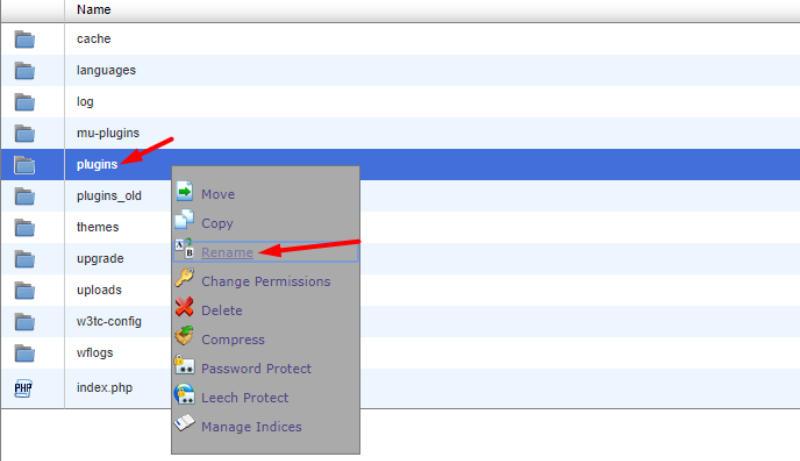
Once you rename the folder, all of your current plugins will be deactivated.
Now try opening your WordPress dashboard, and if you are able to access it, you should pat yourself on the back. The issue is one of the plugins.
If you go to the Plugins section of your WordPress, it will show the error “the plugin has been deactivated due to an error; plugin file does not exist.”
Don’t worry… we have figured out that the problem is one of the plugins.
To reactivate them one by one:
Rename the plugin folder from plugins_old to plugins.
Now from the WordPress dashboard, activate each plugin one by one.
After activating a plugin, browse 3-4 pages on your blog. Repeat this step until you find a plugin whose activation causes the internal server error.
In a majority of situations, this will fix the internal server error problem.
Potential Fix 3: Increase Your Web Hosting PHP Memory Limit
Still not working? Don’t worry… there are still more things that you can try.
Another potential issue is that your WordPress site is hitting its PHP memory limit. By default, WordPress tries to allocate 40MB of memory for single-site installs (as long as your host allows it).
But if you’re experiencing difficulties, you can manually increase this limit (again, as long as your host allows it).
To do this, you’ll need to edit your wp-config.php file. You can access it either via FTP or cPanel’s File Manager:
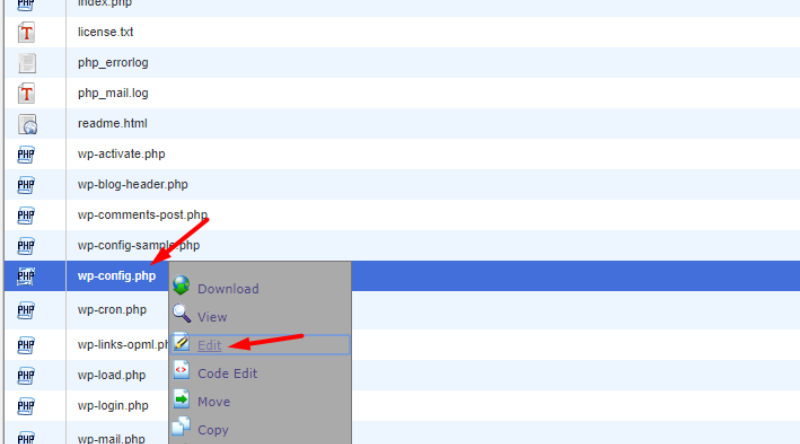
Add the following line of code right beforethe /* That’s all, stop editing! Happy blogging. */ message:
define( 'WP_MEMORY_LIMIT', '64M' );

Remember – this will only help if your host hasn’t already set a PHP limit that’s lower than 64M.
For this reason, if you don’t notice a change after editing your wp-config.php file, I recommend reaching out to your host to see what your current PHP limit is.
Potential Fix 4: Reupload Core WordPress Files
If your site still isn’t working, you can try uploading a clean copy of the core WordPress files.
For this solution, I recommend using an FTP program over File Manager.
Note: Make sure you have taken a complete backup of WordPress before doing this step.
To do this, go to WordPress.org and download the latest version of WordPress:
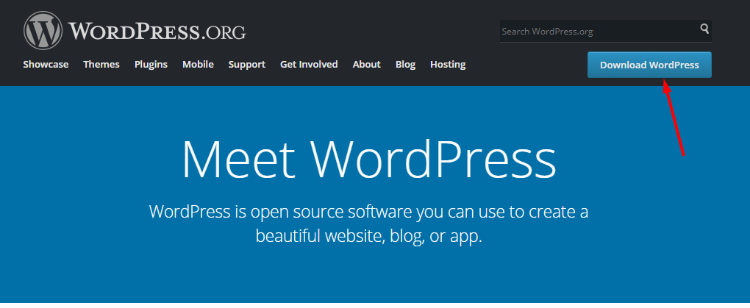
Once the download finishes, extract the ZIP file and delete the:
Entire wp-content folder.
wp-config-sample.php file.
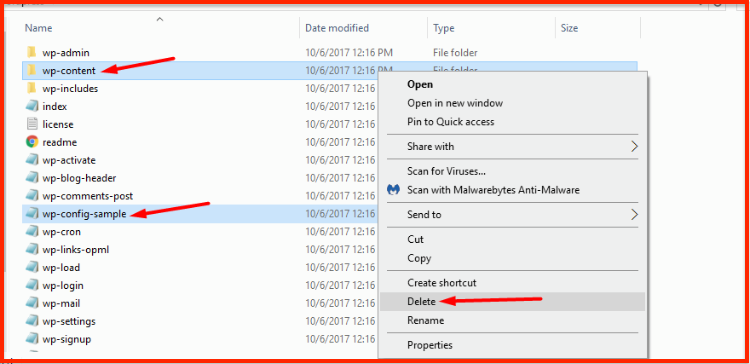
Then, upload all of the remaining files to your WordPress site via FTP. Your FTP program will show you a prompt about duplicate files. When this happens, make sure to choose the option to Overwrite duplicate files.
Fixing The “Internal Server Error” Message
At this point, one of these solutions has hopefully helped you fix the internal server error message on your WordPress site.
If not, I recommend speaking to your host’s support team and asking them to go through the error logs with you to pinpoint the issue. And if they can’t help, you might need to hire an actual WordPress developer to diagnose things.
Or, you can always leave a comment and we can try to figure out the issue together!
Let me know if you’ve faced this issue and what steps you took to overcome it…

0 comments:
Post a Comment